This page covers the use of Squid in a multi-tenant situation - i.e. with multiple IP address that can be assigned based on where in your OpenAthens domain a user sits.
This page concentrates on Linux. Other forwarding proxies are available and will work in similar ways.
Prerequisites
-
Familiarity with your own systems.
-
Sufficient access rights to install and configure software.
-
No fear of the command line (although a healthy respect is always good).
-
You will need to talk to us before you start so that we can prepare the additional files you will need.
Method
There are a couple of differences between Debian and Red Hat derived systems which are highlighted below. Other distros will be similar.
General
-
Install Squid. Most repositories include it, but you can also find binaries through the Squid Web Cache Wiki.
-
Navigate to your install directory (
/etc/squid) -
Edit
squid.conftaking care to use the correctauth_paramline for your distro.Bash# Prevent X-Forwarded-For being overwritten by Squid forwarded_for transparent # Setup ACLs for OpenAthens auth_param basic program /usr/lib64/squid/basic_ncsa_auth /etc/squid/squid_users # RHEL / CentOS based distros # auth_param basic program /usr/lib/squid/basic_ncsa_auth /etc/squid/squid_users # Debian / Ubuntu based distros auth_param basic realm proxy acl authenticated proxy_auth REQUIRED include /etc/squid/acl.conf # Allow authenticated access http_access allow authenticated # Deny all other access to this proxy http_access deny allThree necessary files
/etc/squid/acl.conf,/etc/squid/squid_usersand/etc/squid/addresses.conf(referenced later) define the ACLs and mappings to IP addresses. These will be supplied by OpenAthens. -
Start Squid and set it to autostart according to your OS
-
<squids_ip_address>:3128 should now show an error page generated by Squid
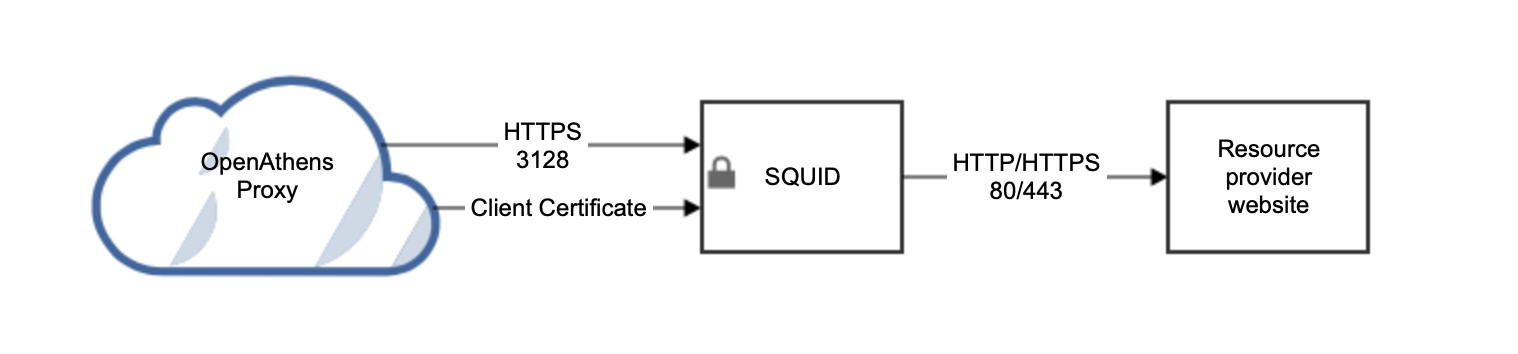
Securing the connection
You want to make sure that the inbound connection is limited to OpenAthens and this is secured using an X.509 client certificate. The squid_users file is used purely for mapping.
The process is a little different depending on which flavour of Linux you are using.
Red Hat based distros such as CentOS
6. Add the following to your squid.conf file:
#http_port xxx.xxx.xxx.xxx:3128

https_port xxx.xxx.xxx.xxx:3128 cert=/etc/squid/ssl_cert/server.pem clientca=/etc/squid/ssl_cert/openathens-client.pem
-
-
xxx.xxx.xxx.xxxis the external IP address of your Squid instance. Remove any and allhttp_portdirectives, leaving only thehttps_portdirective -
server.pemis your server's certificate in Base64 format. This certificate needs to be from a valid certification authority or from Let's Encrypt. If the signer has provided chain or intermediate certifications, also paste these into the file. We will need a copy of the certificate alongside the username and password you set up earlier. Our service desk will be able to advise on secure ways to transfer the information to us. -
openathens-client.pemis the public key of the OpenAthens service and will ensure access is restricted. You can download it from https://proxy.openathens.net/tls/openathens-client.pem -
(Put both certificates in the
/etc/squid/ssl_certfolder)
-
8. Set your firewall rules to
-
allow TCP inbound to port 3128 on this server from any source IP address (the connection from us can come from multiple IPs)
-
allow outbound traffic on standard HTTP ports (80 and 443)
9. Securely pass our service desk the username and password you set up in step 3
Debian based distros such as Ubuntu
At the time of writing the Squid package supplied by Debian is not compiled with the -enable-ssl flag which means the https_port configuration directive is not available and a little more work is required. Since you can't use a simple configuration directive you need to front Squid with something such as stunnel.
6. >apt-get install stunnel4
8. Create /etc/stunnel/stunnel.conf:
pid=/var/run/stunnel4/pid
setuid = stunnel4
setgid = nogroup

[squid-tls]
accept  = xxx.xxx.xxx.xxx:3128
#Don't need to expose squid directly to the internet.
connect = 127.0.0.1:3129
cert = /etc/stunnel/server.pem
CAfile=/etc/stunnel/openathens-client.pem
verify = 4
-
-
xxx.xxx.xxx.xxxis the external IP address of your Squid instance. -
server.pemis your server's certificate in Base64 format. This certificate needs to be from a valid certification authority or from Let's Encrypt. If the signer has provided chain or intermediate certifications, also paste these into the file. We will need a copy of the certificate alongside the username and password you set up earlier. Our service desk will be able to advise on secure ways to transfer the information to us. -
openathens-client.pemis the public key of the OpenAthens service and will ensure access is restricted. You can download it from https://proxy.openathens.net/tls/openathens-client.pem -
(Put both certificates in the
/etc/stunnelfolder) -
Only root should have RW access to the
server.pemfile
-
9. Add the following to your squid.conf file:
http_port 127.0.0.1:3129
10. Set your firewall rules to
-
allow TCP inbound to port 3128 on this server from any source IP address (the connection from us can come from multiple IPs)
-
allow outbound traffic on standard HTTP ports (80 and 443)
11. Securely pass our service desk the username and password you set up in step 3.
