Create personal accounts in bulk
To create new personal accounts as a batch through file upload, there are four basic steps:
Download a blank template file from the admin area
Fill in the template file with your users' data
Convert the file to CSV format
Upload the file to the admin area
This page describes the process in detail, including how to complete the file and how to troubleshoot problems.
Download a blank template file
OpenAthens provides a standard template for user data, so you can create a batch of users without needing to structure the file from scratch.
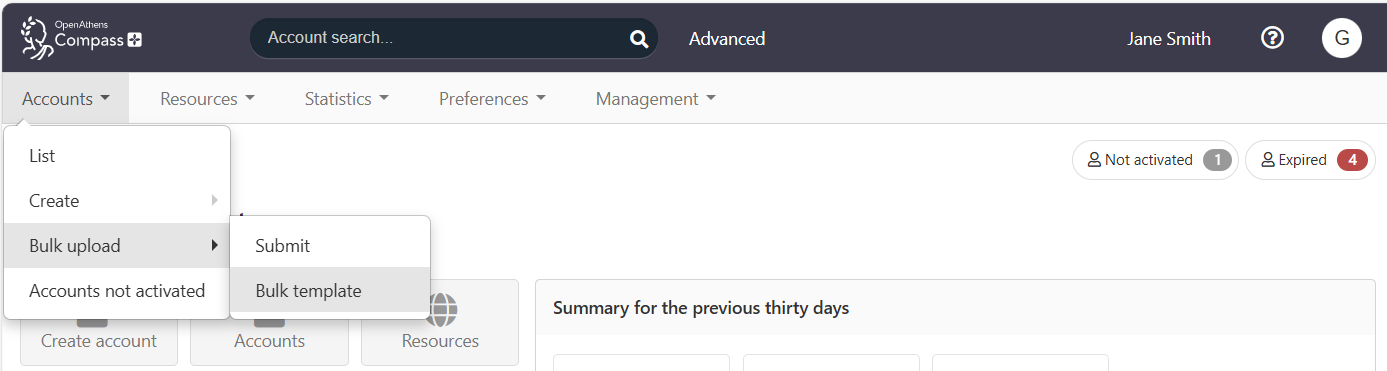
From the main menu, select Accounts > Bulk Upload > Bulk template. The template file automatically downloads in your browser. The file is named [your organisation name].openathens.net_bulk_template.xlsx.
Enable editing.
Delete the sheets modify personal accounts and delete accounts, leaving only the sheet add personal accounts.
Save the file to your computer. Give it whatever name you want.
Fill in the template file
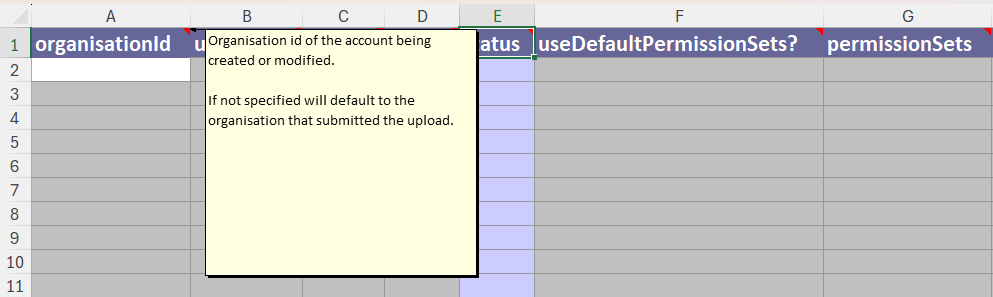
The template file has preset columns of data. Mandatory columns (such as status) are highlighted in a different colour.

General guidelines
Enter each user’s data in a new row
Don’t leave blank rows between users
You can include up to 5000 rows in a file (including the header row). If you need to create more than 4999 users, copy the file template and divide the users across multiple files
All input must be in the ISO-8859-1 character set
Some columns have a fixed choice of values (e.g. TRUE or FALSE). When entering data in one of these columns, you can pick the appropriate value from a drop-down list. You can also type the value, but your typed input must match one of the preset values
All mandatory columns must contain a value
If a column is not mandatory, and you don’t want to fill it in, you can delete that column from the spreadsheet
You can also reorder the columns, for example if that makes it easier to paste data from another document
Don’t change any of the column headings
Data columns in the upload file
The following table shows standard columns and their required values. If your upload template has been customised for your institution, it may include different columns from those described here. Check the guidance provided in the template file.
Column name | Description | Required value | Mandatory? |
|---|---|---|---|
organisationId | OpenAthens ID of the parent organisation to which the user belongs | Find in the admin area under Management > All organisations | No. If empty, the ID will be inserted automatically |
username | Username of the new user | 6-20 characters, including the account prefix. Can include letters, numbers, the dot (.), the hyphen (-) and the underscore (_), but no other special characters. Must be unique | No. If empty, a username will be generated automatically in the form prefix + first initial + surname + three-digit number (e.g. ‘acmejmendez001’). In the following circumstances, automatically generated usernames can fail, so you must enter a username manually:
|
groups | Group to which to assign the new user | Name of a group (case sensitive). See Management > Groups | No |
expiry | Date on which the user’s account should expire | Date in YYYY-MM-DD format | No. If empty, the default expiry period specified in Preferences > Account will apply |
status | Whether or not the user’s account is active immediately | Either pending or active. We recommend setting this field to pending. If pending, the new user will be sent a request to activate their account and create a password. Ensure emailUser? is set to TRUE so they can receive the activation email. If active, you must supply a password for the user in the password column so they can log in | Yes |
useDefaultPermissionSets? | Whether or not to allocate all default permission sets to this user | TRUE or FALSE | No. If empty, this field is treated as FALSE |
permissionSets | Specific permission sets to assign to this user | Names of permission sets. Enter each permission set on a new line (Alt+Enter). The name of a permission set, which you can see in Resources > Permissions sets > [select a permission set], is in the form domain#permission, e.g. acme#alumni | No. However, be aware that users may need permissions to access resources |
emailUser? | Whether or not to email the user when their account is created or updated | TRUE or FALSE | If the user’s status is pending, you must set this field to TRUE so that they receive an account activation email |
allowEmailLogin? | Whether this user is permitted to log in using their email address in place of their username. Enable this option only if the user has a unique email address | TRUE or FALSE | No. If empty, this field is treated as FALSE |
password | Password for this user | We recommend leaving this field empty and allowing the user to create their own password upon activation. If for any reason you need to enter a password, see the password guidelines | Only if status is set to active (not recommended). We recommend leaving this field empty, setting status to pending, and allowing the user to create their own password upon activation |
attribute/title | Title of the user | A standard title, e.g. ‘Mr’, ‘Ms’, ‘Dr’ | No |
attribute/forenames | Given name or names of the user | If the user has more than one forename, separate them by a space (e.g. ‘Mary Anne’) | Yes |
attribute/surname | Surname (family name) of the user | If the user’s surname comprises more than one word, write it normally (e.g. ‘Sanchez Cabrera’ or ‘van Doorn’) | Yes |
attribute/department | Department to which the user belongs | Standard name for a department in the user’s institution | No |
attribute/position | Position of the user | Standard name for a position in the user’s institution | No |
attribute/emailAddress | Email address of the user | Valid email address | Yes |
attribute/phone | Telephone number of the user | Can include spaces, punctuation and letters as well as numbers (e.g. 555 5555 or 1800-FLOWERS) | No |
attribute/identifier | Institutional identifier for the user, such as a student number | Standard identifier | No |
attribute/postalAddress | Postal address of the user | Normal address format, on multiple lines (Alt+Enter). | No |
attribute/notes | Notes on the user | Free text | No |
You can also see an explanation of each column by hovering over the column heading in the spreadsheet.
If you don’t need to fill in an optional field, don’t - this helps you avoid possible errors from mistyping information. See Troubleshooting.
Save the file as CSV
The upload file must be in .csv format. The original .xlsx template includes features for guidance that are not compatible with .csv. Once you have filled in and reviewed the data, convert the file.
In your spreadsheet program, select Save as and choose to save the file as .csv.
Since .csv files do not support multiple sheets, you may be asked to save ‘only the active sheet’. Agree.
The .csv file will look much plainer than the original template. That is normal.
Upload the file
From the main menu, select Accounts > Bulk upload > Submit. A pop-up window opens, showing the file upload interface.
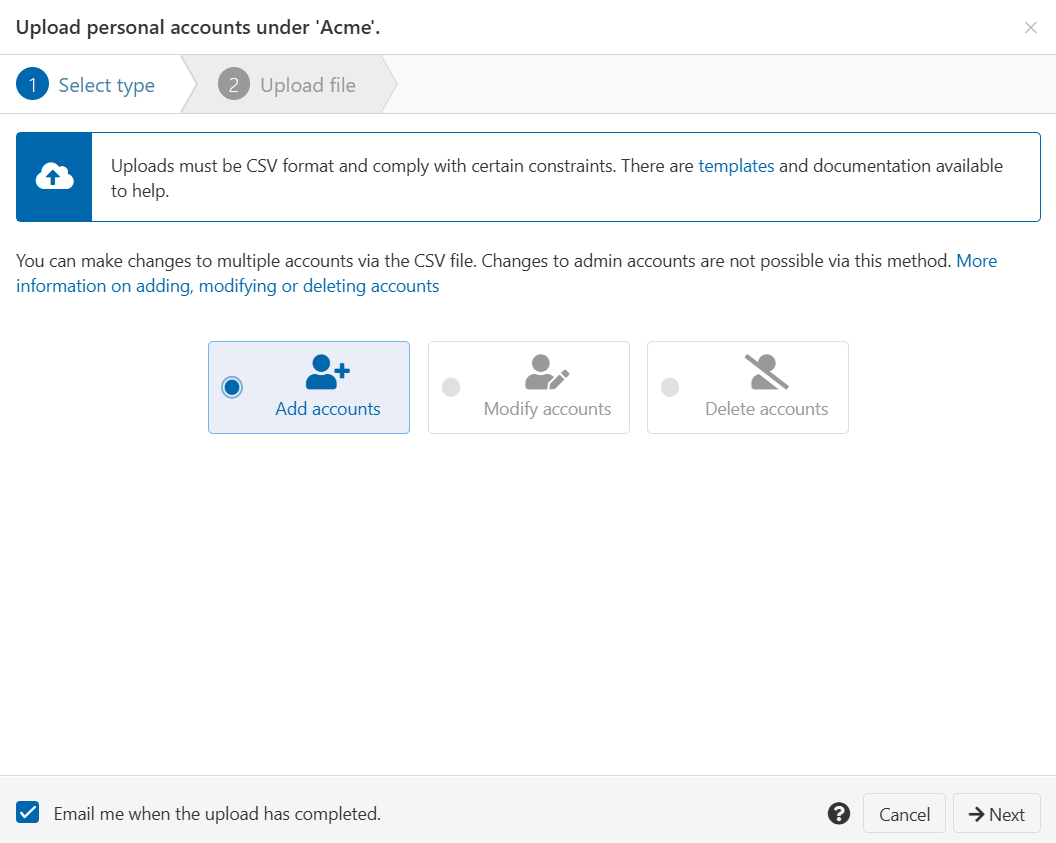
Select Add accounts (the default).
Press the Next button.
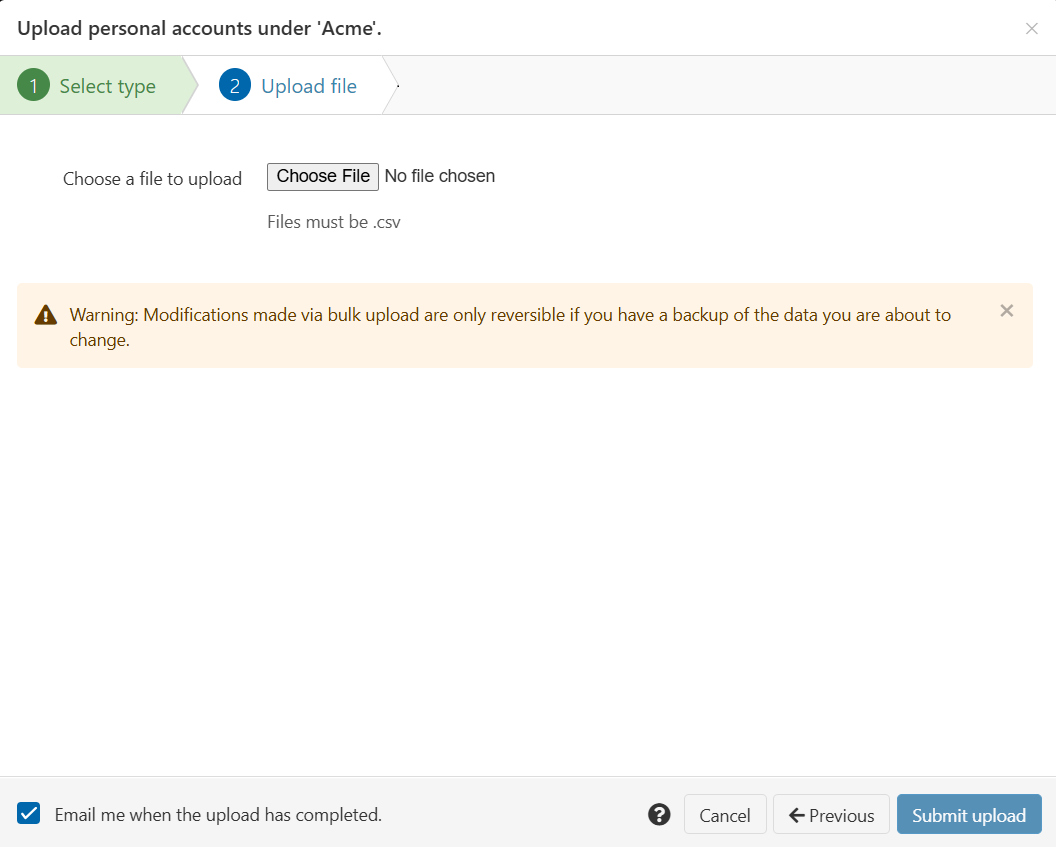
Press Choose File and select the .csv file from your computer.
Press the Submit upload button.
If the upload is successful, you receive an initial confirmation message, followed by another confirmation message when OpenAthens has finished creating the new user accounts. (The time this takes depends on the size of the file.)

If upload fails, you receive an error message that explains the problem. See Troubleshooting.
Edit the incorrect part of the file, save and upload again. (The upload interface remains open at the same place, so you do not need to go through steps 1-3 again.)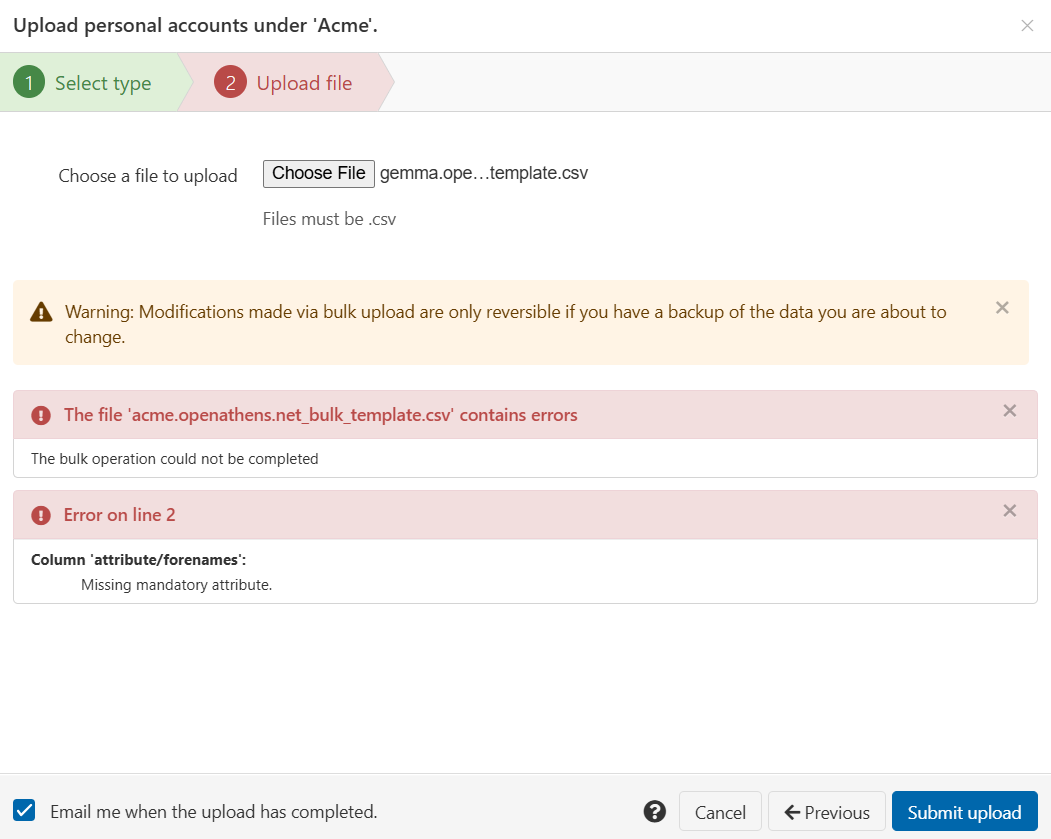
If the file uploads but there are problems with one or more users' data, you receive an initial message confirming the upload, followed by a message warning you that not all user accounts were created.
To see user accounts that were successfully created, go to Accounts > List > Personal.
To help you fix accounts that failed, OpenAthens automatically generates a file of the failed user data. You can download this file, edit incorrect fields, and perform another upload of those accounts. See Troubleshooting for details.
Troubleshooting
Error messages
When you submit a file, OpenAthens performs validation. If it finds an error, you get a warning message.
There are two stages of validation:
OpenAthens checks for structural problems in the file as a whole. If it finds one or more of these problems, upload fails. You need to fix the data that caused the error and try again.
Once the file is uploaded, OpenAthens checks the data you provided for individual users. If all data for a user passes validation, an account is created for that person. If a user’s data contains errors, that person’s account creation fails. Both failed and successful account creations can result from the same file.
Errors that cause the whole upload to fail
These errors typically involve mandatory fields being empty, or data not being in the format required by the software.
Column ‘username’: Username must be between 6 and 20 characters
You entered a username that was too long or too short.Column ‘expiry’: Date ‘27/04/2026' is invalid. Dates should be in the format yyyy-MM-dd
A date in the expiry column was wrongly formatted. Always enter dates as YYYY-MM-DD, for example ‘2026-04-27’. Be aware that spreadsheet software can automatically convert the date you entered to a different format. If this happens, you might need to format the expiry field as plain text rather than as a date.Column ‘status’: Status is not valid
You entered something non-standard in the status column. To avoid this, pick a status from the drop-down list rather than typing into the field. The status of a new user must be pending or active.Column ‘status’: Missing status
You left the mandatory status column empty. The status must be pending or active.Column ‘status’: Cannot create an active account without a password
You set a user to active without filling in the password field. We recommend setting new users to pending rather than active, and letting them activate their account and create their own password.Column ‘useDefaultPermissionSets?’: Value must be TRUE or FALSE
You entered something non-standard in the useDefaultPermissionSets? column. To avoid this, pick a status from the drop-down list rather than typing into the field.Column ‘emailUser?’: Value must be TRUE or FALSE
You entered something non-standard in the emailUser? column. To avoid this, pick a status from the drop-down list rather than typing into the field.Column ‘allowEmailLogin?’: Value must be TRUE or FALSE
You entered something non-standard in the allowEmailLogin? column. To avoid this, pick a status from the drop-down list rather than typing into the field.Column ‘password’: This is a very common password, This is similar to a commonly used password, Names and surnames by themselves are easy to guess, etc.
You created a password for a user that is too easy to guess. See the password guidelines, though we recommend that you set a new user’s account to pending and do not assign them a password.Column ‘attribute/forenames': Missing mandatory attribute
You did not provide the forename(s) of a user.Column ‘attribute/surname’: Missing mandatory attribute
You did not provide the surname of a user.Column ‘attribute/emailAddress’: Missing mandatory attribute
You did not provide the email address of a user.Column ‘attribute emailAddress’: Invalid email address
An email address was not correctly formed.
Errors that cause individual accounts to fail
These errors typically involve fields that are optional but that, if completed, must contain accurate data.
Column ‘organisationId’: Organisation does not exist
You entered an organisation ID that was not recognised.Column ‘username’: Invalid prefix for username
You entered a username that did not include the account prefix, or in which the prefix was misspelled.Column ‘username’: This username is already in use
You entered a username that was not unique.Column ‘group’: Group does not exist
You entered a group that was not recognised.Column ‘permissionSets’: Invalid permission set(s)
You entered a permission set that was not recognised.
If you receive an error message less friendly than these, your logged-in session has probably timed out. Return to the login screen, log in to the admin area and try again.
Download and edit failed user data
If some accounts in the upload fail to be created, OpenAthens generates a version of the file that contains only the failed user data. You can find this file in Management > Downloads. It has the type ‘Account upload failures’ and is identified by date and time.
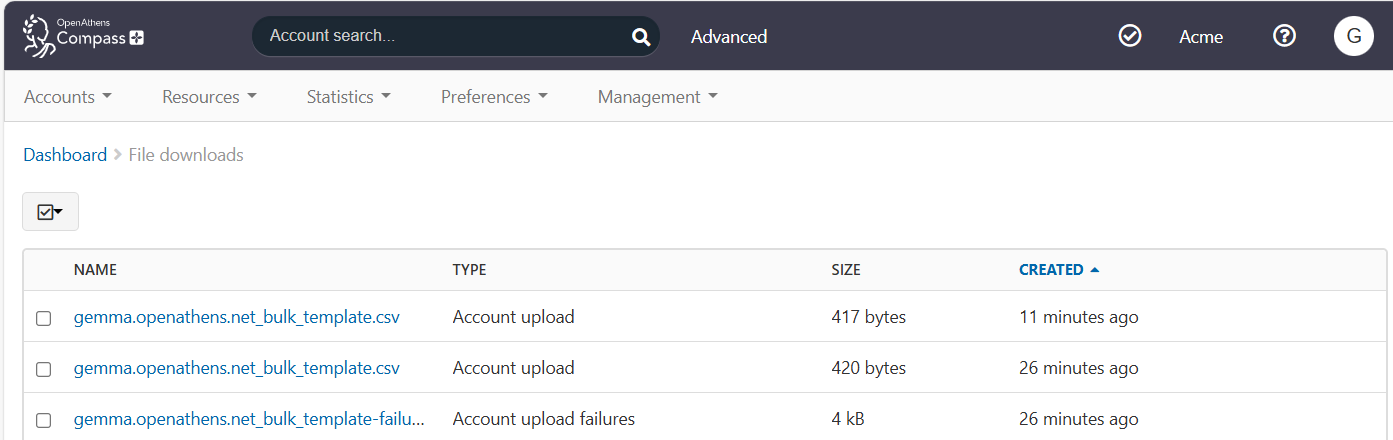
To revise and resubmit failed users, click the name of the ‘Account upload failures’ file. The file downloads automatically in your browser.
Review the data in the file. If you originally omitted fields that have default values, such as organisationId, you will find that the default values have been filled in. This helps you to see exactly what data the system received for each user.
Fix any incorrect data (see Troubleshooting for details). Save the file as .csv under a new name. Try to upload the users again.