Using Google Workspace (formerly G Suite) as an example, this guide explains how to set up and configure a SAML source to sign in to OpenAthens.
Prerequisites
-
Access to your Google Workspace admin console
-
Access to the OpenAthens administration area
Method
Configure Google Workspace settings
In your Google admin console:
-
Complete the following settings:
|
Field |
|
|---|---|
|
Application name |
Anything that makes sense to you |
|
Description |
Anything that makes sense to you |
|
ACS URL |
Come back to this later. To get through the setup wizard, enter something like '
|
|
EntityID |
Come back to this later. To get through the setup wizard, enter something like '
|
|
Start URL |
Leave empty |
|
Signed Response |
True |
|
Name ID |
Use primary email |
If you exit the setup wizard before completing all the details, you will need to download the metadata (which will have changed) again on your next session.
-
Set up attribute mapping for at least the email address (Name ID). Make a note of the attribute name you choose for reference. If you need other user attributes, you can set those up either now or later. (Attribute names are case sensitive.)
Configure OpenAthens settings
-
In your OpenAthens admin area, go to Management > Connections.

-
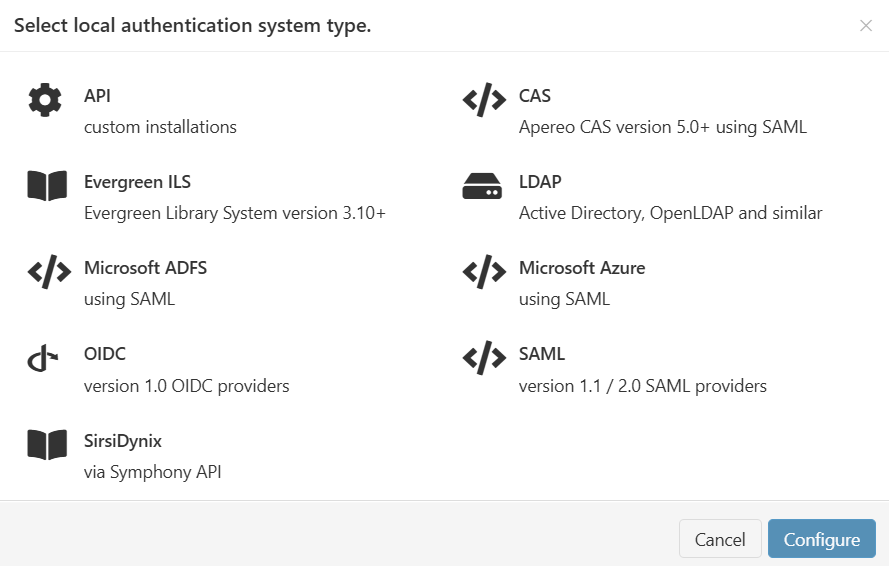
Under Local authentication in the left sidebar, press Create. A pop-up opens, showing available connectors.
-
Select SAML and press Configure.

-
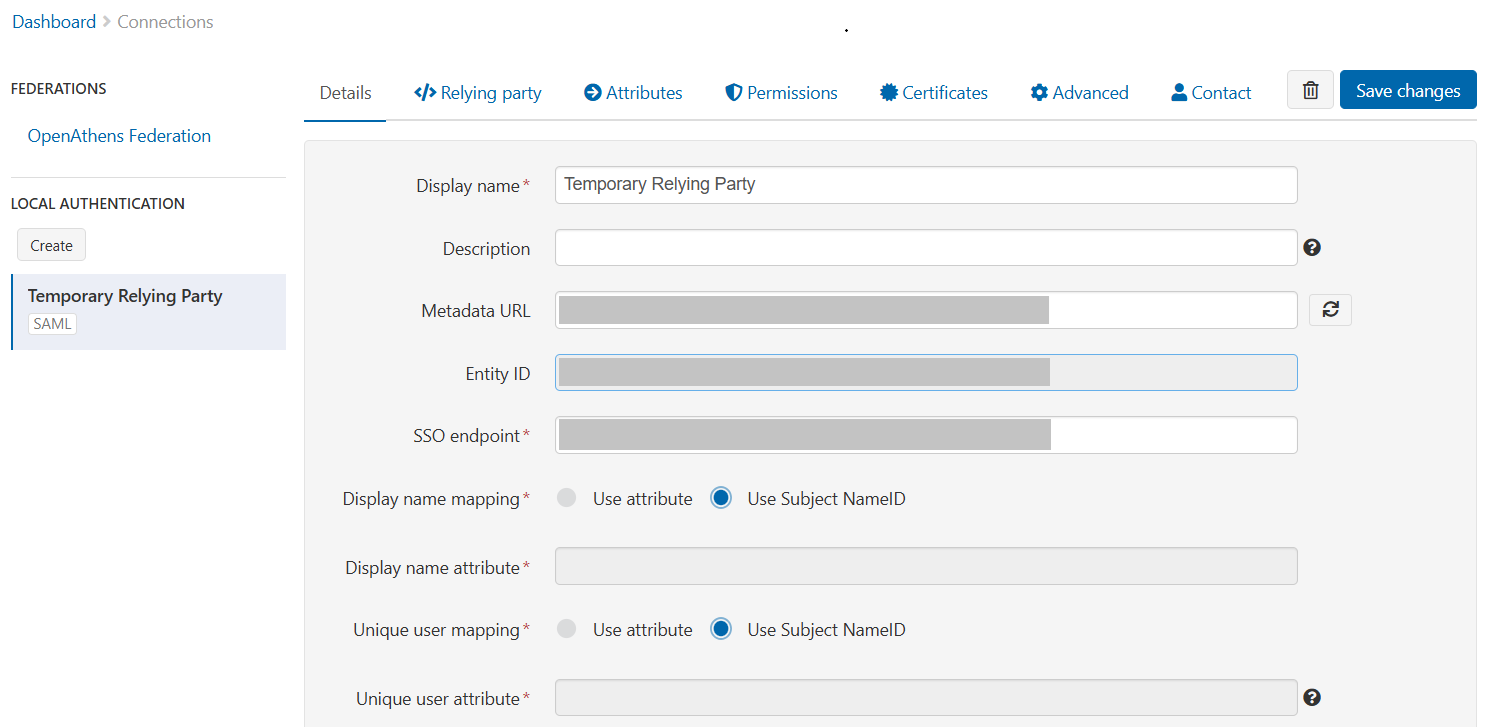
Click the Choose File button and upload the Google metadata.
-
Press Add. The connector is created. You can now view or edit its details.
-
Set both Display name mapping and Unique user mapping to Use attribute.
-
In both the Display name attribute and Unique user attribute fields, enter the name of the email address attribute you configured in Google.
-
Press Save changes.
-
Finally, go to the Relying party tab and copy the Metadata URL shown there.

For more details on this type of connection, see SAML connector.
Complete Google Workspace configuration
Once the OpenAthens connection is set up, update the ACS URL and EntityID placeholders in your Google Workspace SAML app.
Construct ACS URL and EntityID
Take the metadata URL you saved from OpenAthens and copy the second half of it, beginning with your individual domain name. For example, if the metadata URL is https://login.openathens.net/saml/2/metadata-sp/yourdomain.net/la/1234, copy the part “yourdomain.net/la/1234”.
Your ACS URL is https://login.openathens.net/saml/2/acs/[individual part of the metadata URL], for example https://login.openathens.net/saml/2/acs/yourdomain.net/la/1234.
Your EntityID is https://login.openathens.net/saml/2/metadata-sp/[individual part of the metadata URL], for example https://login.openathens.net/saml/2/metadata-sp/yourdomain.net/la/1234.
Configure your Google app
-
In your Google admin console, go to the app you created.
-
In the Service provider details section, enter the following information:
|
Field |
|
|---|---|
|
ACS URL |
https://login.openathens.net/saml/2/acs/[individual part of the metadata URL] |
|
EntityID |
https://login.openathens.net/saml/2/metadata-sp/[individual part of the metadata URL] |
-
Perform any further configuration you need, for example:
-
Activate the app
-
Allocate the app to users
-
Set additional attributes for release
-
Assign permission sets based on the attributes passed by Google
-
Testing
Prepare for testing
If you are not already using OpenAthens in production:
-
In the OpenAthens admin area, go to Manage > Connections.
-
Open your Google connection for editing.
-
In the Details tab, set the Status of the connection to Live, Visible and Default.

-
Save your changes.
If you already have active users, you have two options:
-
Enable OpenAthens login so that users are given a choice of login options. Good if you have many testers.
-
In Preferences > Domain, turn on the option Show OpenAthens sign-in. Save your changes.
-
In Manage > Connections, set the Status of your SAML connection to Live and Visible (but not Default). Save your changes.
-
-
Use debug mode. Good if you have only a few testers.
There is no need to set the Status of your SAML connection as live or visible. In debug mode, the connection does not appear for end users.
Test
-
Clear any OpenAthens or Google account sessions. You may find private browsing mode useful.
-
Go to a resource. At the WAYF prompt, select your Google app account.
-
Depending on how you are testing:
-
Debug and dual modes give login options. Select the Google option to use the Google login.
Debug mode additionally shows you the attributes being passed to OpenAthens by Google, and from OpenAthens to the resource. You will need to click a button to proceed. -
Default mode transfers you directly to the Google login.
-
-
The account you signed in with should also now appear in the relevant section of the accounts list in the OpenAthens administration area.
Go live
Once you are happy that the connection is working, ensure it is set it as Live and Visible. If it is to be your only login option, also set it as Default. Disable the option Show OpenAthens sign-in in Preferences > Domain if you previously enabled it.
While our service desk will always try to be helpful, they can only support the OpenAthens end of the connection.